
When a client requests low voltage LED strip lighting for an under cabinet lighting project or a retail display, installation requires specific attention to Class 2 requirements that differ from typical line voltage work.
Low voltage LED systems operate at 12V or 24V DC under Class 2 circuit requirements, with specific current and wattage limits that differ from standard line voltage installations. These systems require attention to DC polarity, voltage drop calculations, and NEC Article 725 compliance.
Five Class 2 Circuit Considerations
This guide covers the five Class 2-specific requirements that ensure compliant, reliable low voltage LED installations:
- Class 2 wiring requirements and current limitations
- DC polarity and proper positive/negative connections
- Maximum run lengths and voltage drop calculations
- NEC Article 725 compliance requirements
- Proper cutting locations and connection methods
Following these requirements delivers installations that meet code and maintain consistent performance.
What is Low Voltage Lighting?
Unlike line voltage installations, Class 2 low voltage systems operate on current-limited circuits of 96 watts or less with specific requirements defined in NEC Article 725.
The main advantage of working with Class 2 systems is safety and simplicity. Because the voltage and current levels are much lower, the risk of shock or fire is minimal, and the rules for enclosures and junction boxes are less restrictive than those for Class 1 systems.
A common question is, “Are all LED lights low voltage?” Not all of them. Many fixtures, like standard household bulbs, run on line voltage (120VAC). However, LED strip lights almost always operate on low voltage, typically 12VDC or 24VDC, because it allows for flexible installation, safe handling, and better control options.
Between the two, 24V systems have clear advantages. Since the voltage is doubled, the current is cut in half, which significantly reduces voltage drop over long runs. This helps maintain consistent brightness, keeps the system running cooler, and allows you to use smaller-gauge wire for longer distances.
To compare low voltage to line voltage wiring:
- Line voltage uses black (hot), white (neutral), and green (ground) conductors, with current alternating directions.
- Low voltage DC systems typically use red for positive (+) and black for negative (–), with current flowing in a single direction.
The Big Difference - DC Polarity Matters
One of the biggest differences between line voltage alternating current (AC) and low voltage direct current (DC) power is the importance of polarity. In AC systems, like the standard 120V wiring used in homes, the current alternates direction, so polarity isn’t a concern. But in DC systems, such as those used for most low voltage LED lighting, polarity matters – a lot.
Many people assume it doesn’t, but that’s not the case. The “D” in LED stands for diode, and a diode is a one-way electronic device. It allows current to flow in only one direction, from positive to negative. Think of it like a gate that only opens one way. If you connect your LED to your power supply backward, the current can’t pass through, and the light simply won’t turn on.
When you’re troubleshooting a circuit that isn’t working, one of the first things to check is polarity. If everything else looks correct (the power supply is on, connections are secure, and voltage is correct), but the lights still won’t illuminate, try reversing the polarity. In many cases, that’s all it takes to get the system working.
For single-light or simple LED strip circuits, polarity is usually indicated by wire color. The red wire represents the positive (+) connection, and the black wire represents the negative (–). Always check what each wire is connected to – most strip lights, power supplies, and controllers are clearly labeled with “+” and “–” to help you line everything up correctly.
Taking a moment to verify polarity during installation can save a lot of time and frustration later. It’s a simple step, but one that’s critical to ensuring your low voltage LED system operates safely and reliably.
Maximum Run Lengths and Voltage Drop
Voltage drop refers to the loss of electrical power that occurs as current travels through a wire over distance. Ideally, a conductor should deliver energy efficiently from the power supply to the light; however, some of that electrical energy is converted into heat as it moves through the wire. That loss of energy shows up as a drop in voltage along the wire run – hence the term voltage drop.
This relationship between voltage, current, and distance isn’t linear – it’s exponential. In simple terms, a 12V LED strip draws twice the current of a 24V strip to produce the same light output. However, the effects of voltage drop at 12V are more than double because the lower voltage makes the system more sensitive to resistance in the wiring. As a result, higher-voltage systems experience less voltage drop, which allows them to run longer distances before light output begins to fade.
You’ll see this reflected in the specifications for different LED strips. For example, an N-Series 12V strip has a maximum run length of 16.4 feet, while a 24V version of the same product can run up to 32 feet – exactly double. While not every LED strip light can be run double the length when using 24V compared to 12V, the maximum run length limit of each strip light is due to voltage drop. Once you exceed the rated maximum run length, the LEDs farthest from the power supply will start to dim because the voltage reaching it has fallen below what the LEDs need to operate correctly.
When your project requires a longer LED run than the maximum published length, the solution is to create a new home run wire connection. In other words, run another set of wires directly from the power supply to the start of the next strip light section. This ensures that each section receives full voltage and consistent brightness.
For more details on voltage drop and how to calculate the correct size wire to use, you can refer to Magnitude’s Voltage Drop Chart. Understanding how voltage drop works, and planning for it, helps ensure your lighting installation runs efficiently, looks uniform, and performs exactly as expected.
NEC Article 725 - Your Code Requirements
The National Electrical Code (NEC) sets the national standard for what qualifies as low voltage and how it must be installed. These requirements are defined in Article 725 of the NEC, which outlines the rules for Class 1, Class 2, and Class 3 circuits. The 2023 edition of the NEC is the most current version, and it clearly defines what Class 2 circuits are, including their voltage and power limits, and the conditions under which conduit or other protective enclosures are required or not required.
Article 725 also provides guidance on how low-voltage wiring should be handled in commercial and residential installations, as well as best practices for planning and designing low-voltage systems. These rules help ensure that systems are safe, reliable, and code-compliant, especially when dealing with LED lighting, controls, and power supplies that fall under Class 2 limits.
It’s important to remember that the NEC is updated every three years to reflect new technologies, materials, and safety practices. The next update is scheduled for 2026, and changes in each edition can affect how projects must be installed or inspected.
While the NEC provides the national baseline, your local Authority Having Jurisdiction (AHJ) – often your city or county building inspector – has the final say on which version of the code is enforced in your area. Local amendments may also apply, depending on your region and the type of project. Always consult your local building inspector. They are the final authority.
Cutting, Connections, and Controllers
Article 725 of the National Electrical Code (NEC) defines many of the rules that influence how you make connections, what types of wiring you can use, and how those connections must be sealed. Understanding these guidelines helps ensure your installation is safe, reliable, and code-compliant, especially when working with LED strip lighting.
When working with LED strips, there are a few key points to remember:
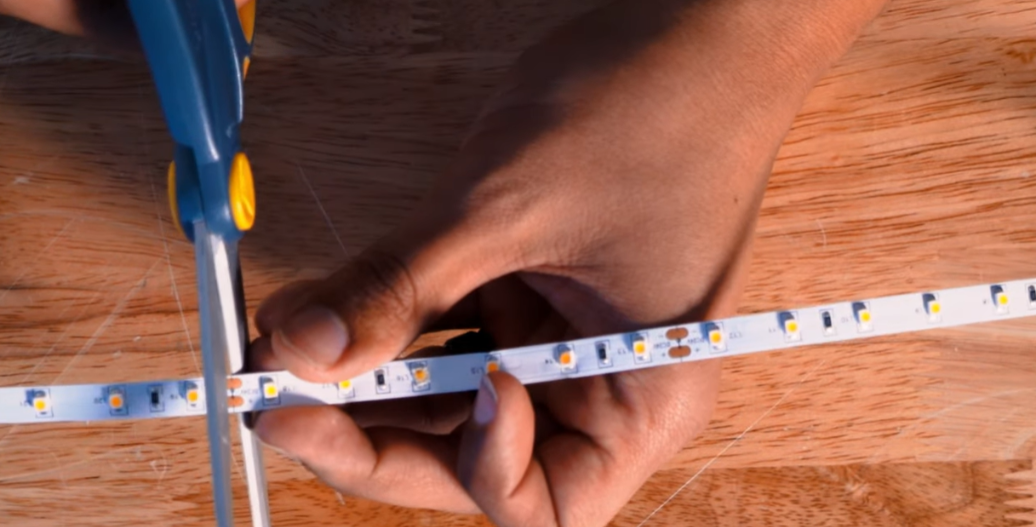
- Cutting the strips: You can only cut LED strip lights at the designated copper pad marks, usually indicated by a small copper circle with a line through it. Cutting anywhere else can damage the strip or prevent it from working properly.

- Polarity: At each connection point voltage and polarity are clearly labeled, typically as 12V or 24V, “+” and “–”. Maintaining correct voltage and polarity is essential for proper operation.
-
Connection options: All our strip lights come with factory-soldered wire leads on both ends:
- Single-color LED strips will have a 2-conductor wire lead (V+, V-)
- Tunable white LED strips will have a 3-conductor lead (V+, Warm White, Cool White)
- RGB LED strips will have a 4-conductor lead (V+, R, G, B)
- And RGBW LED strips will have a 5-conductor lead (V+, R, G, B, W)
- Controllers: There are many types of controllers available, but it’s important to make sure you choose one that is compatible with low-voltage LEDs. All aspectLED products and controllers indicate their compatibility in the specifications. If you’re unsure, contact support at support@aspectled.com for guidance.
- Power supply: Always use a DC power supply that matches your LED strip voltage – typically 12V or 24V. To ensure safety and longevity, never load a power supply beyond 80% of its rated maximum wattage. This ensures consistent performance and prevents overheating or early failure.
By following these guidelines for cutting, connecting, and powering your LED strips, you’ll have a safe, reliable, and professional-looking installation. Paying attention to these details from the start makes troubleshooting and long-term maintenance much easier.
Standard vs. Low Voltage LED - Quick Comparison
Line voltage is typically 120V or 240V AC and requires specific wiring and connections. All wiring must be enclosed in Romex, conduit, or MC cable, and installation must follow strict electrical rules. Because of these regulations, it’s always important to consult your local Authority Having Jurisdiction (AHJ) or building inspector before starting any project.
Low voltage LED systems generally have more relaxed rules regarding enclosures, but local codes still apply. Additionally, in a typical home with 120V power, using low voltage LEDs requires a power supply or driver. This device steps down the voltage from 120V AC to 12V or 24V DC and converts alternating current to direct current.
It’s also important to understand how LED lighting works in practice. While all LEDs operate on low voltage internally, your application may still involve line voltage depending on the setup. For example, low voltage LED strip lights are usually used for accent or task lighting, rather than general illumination. The reason is that LED strips typically don’t produce enough lumens to serve as primary room lighting, whereas 120V systems have historically provided the power needed for general lighting applications.
Understanding these distinctions helps ensure you choose the right components, stay compliant with code, and achieve the desired lighting effect safely and efficiently.
Professional Advantages of Low Voltage
There are several advantages to using low voltage (12V or 24V) Class 2 circuits under 96 watts for your lighting projects.
First and foremost, low voltage is generally considered safer to work with. While you should always turn off breakers and treat every circuit as live, the National Electrical Code recognizes Class 2 circuits as a safer working voltage and current. This makes them ideal for installations where hands-on access is required.
Low voltage is also a natural fit for LEDs, which are inherently direct current (DC) devices. Operating at 12V or 24V allows LEDs to function efficiently without additional conversion. Most LED controls, especially for RGB and RGBW fixtures, also operate on low-voltage DC protocols, such as pulse-width modulation (PWM), which makes system design simpler and more compatible.
In certain applications, working with low voltage can be more energy-efficient, particularly in off-grid or solar-powered setups. Converting power from DC to AC and back again can reduce efficiency, whereas keeping the system at its native low voltage minimizes these losses.
Another practical advantage is that Class 2 wiring often has less strict enclosure requirements than line voltage systems. In many jurisdictions, connectors and wiring do not need to be enclosed in a junction box, which can save time during installation. Ultimately, this depends on your local building codes, so it’s always important to consult your local Authority Having Jurisdiction (AHJ) to ensure compliance.
Overall, low-voltage Class 2 systems offer a combination of safety, efficiency, and flexibility, making them ideal for modern LED lighting installations.
To Conclude
Low voltage LED installations follow the same fundamental principles as line voltage work -circuit planning, secure connections, and systematic troubleshooting. The key differences are DC polarity requirements, voltage drop calculations, and Class 2 wiring standards under NEC Article 725. Understanding these specifications ensures code-compliant installations that maintain consistent performance across the full run length.
To make your next project even easier, join our Pro Program for exclusive resources, support, and guidance tailored to professional contractors.


