
Mud-in LED channel has become a go-to architectural lighting solution in modern residential and commercial projects. Chosen primarily for its clean, trimless appearance; mud-in channel allows light to emerge from a seamless slot in the wall or ceiling without visible trim, bezels, or embellishments. The result is a minimalist aesthetic where the lighting feels integrated into the architecture rather than added onto it.
Advancements in LED strip technology have made achieving this minimalist aesthetic possible. Modern LED strip lights are compact, efficient, and capable of producing smooth, continuous light. This enables designers to place light in locations that were previously impractical. Anywhere drywall or plaster exists, a mud-in channel can be embedded – creating lighting that appears to disappear when turned off and feels intentional and refined when illuminated. This is why mud-in channel is frequently specified in high-end homes, modern retail spaces, and contemporary commercial interiors.
For lighting professionals, contractors, architects, and designers, this article breaks down how mud-in channel systems function, what’s involved in installation, and why they continue to be specified in modern lighting projects.
Understanding Mud-In Channel Systems
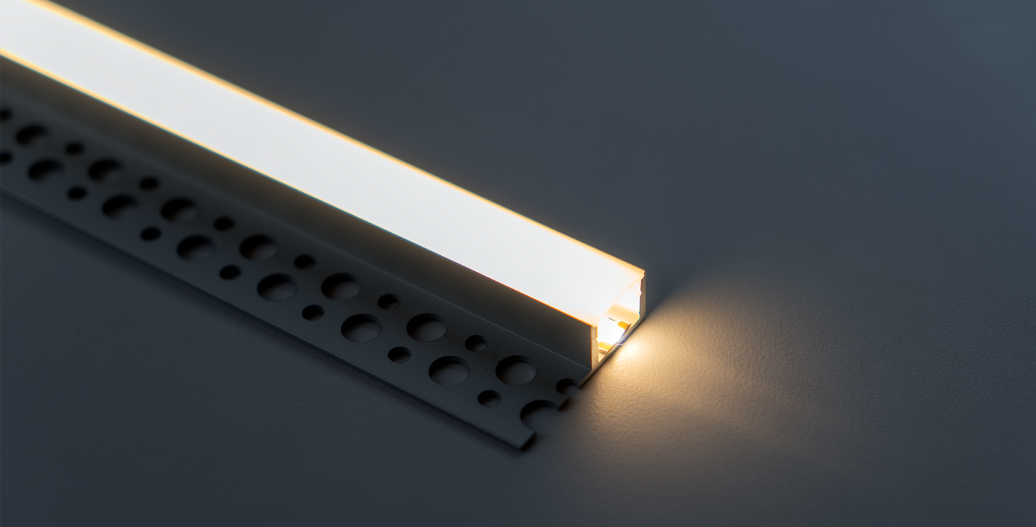
A mud-in channel is an aluminum LED channel designed to be embedded directly into drywall or plaster assemblies. Unlike surface-mounted channels, mud-in channels have perforated flanges that are covered with joint compound or plaster during finishing, creating a flush, trimless appearance once painted.
A complete mud-in channel system includes three key components:
- Aluminum mud-in LED channel
- The diffuser lens (frosted or smoke)
- The LED strip light and power supply
The aluminum channel provides structure, alignment, and heat dissipation for the LED strip, helping extend its lifespan. The diffuser softens the light output, reduces glare, and improves visual comfort, while the LED strip delivers the actual illumination.
Mud-in channels are typically specified early in a project, often during the design or pre-construction phase, because proper installation requires coordination across framing, electrical, and drywall trades.
How Mud-In Channel Is Installed
Installing mud-in channel is a multi-stage process that begins earlier than many other lighting solutions. Successful installations rely on planning and coordination from the start.
The process begins during framing. Blocking (wood backing secured to the framing) is required anywhere the channel will be mounted. If a channel is installed where no framing member exists, blocking must be added to provide a firm, stable mounting surface. This is critical for long-term performance, as proper backing helps prevent movement, cracking, and finish issues as the building naturally shifts over time. Blocking is typically recommended at 16 inches on center.
During the electrical phase, in-wall-rated wiring must be run to each channel location. These feeder wires are installed before drywall goes up, ensuring power is ready once the channel is mounted. Once drywall is installed, the channel is secured directly to the blocking behind the wall, not to drywall alone.
[Drywall anchors are not recommended for mounting mud-in channel. Most drywall anchors include a lip that sits proud of the sheetrock, which can prevent the channel from sitting flush. Even small offsets can compromise the finished appearance and lead to visible imperfections once mudded and painted.]
After the channel is mounted and aligned, joint compound or plaster is applied over the channel flanges and feathered into the surrounding surface. Proper finishing technique is essential to achieve a true trimless look. The LED strip light and diffuser are typically installed after finishing and painting to avoid damage during construction.
Retrofit Considerations
Retrofitting mud-in channel into an existing finished wall is possible but comes with limitations. If the channel can be laid out to intersect existing studs or framing members, it can often be securely mounted without major reconstruction. Wiring must still be run through enclosed walls and must meet code requirements.
If no framing exists where the channel is desired, blocking must be added. This usually involves cutting a section of drywall large enough to install code-compliant blocking securely. Regardless of whether the project is new construction or retrofit, blocking is essential: mud-in channel should never be mounted without it.
Key Advantages for Professional Projects
Mud-in channel offers several benefits that make it especially attractive for professional installations.
- Its trimless aesthetic aligns with contemporary architectural trends and allows lighting to complement, rather than compete with, the design.
- The diffuser improves light quality by reducing glare and softening the output.
- The aluminum channel acts as a heat sink, supporting LED performance and longevity.
For larger projects, mud-in channel provides consistent, repeatable results across multiple spaces. When properly specified and installed, it enhances the perceived value of the finished environment and delivers a high-end, intentional look.
Typical Applications in Residential and Commercial Spaces
Integrated Millwork
Coordinate with cabinet shops early, as channel placement often needs to be finalized before casework is built, not after. Lead times for custom millwork can exceed channel lead times, so backing details should be shared during shop drawing review.
Stairwells
Continuous runs along stair stringers require careful voltage drop planning. For runs over 20 feet, consider dual-feed configurations or mid-point power injection to maintain uniform brightness.
Hallways and Corridors
Mud-in channel is well suited for long, linear runs that guide circulation and create visual continuity. Extended lengths should be planned with proper power distribution to avoid dimming at the end of runs.
Kitchens and Bathrooms
Often used for ceiling slots, wall accents, or integrated lighting near millwork, these spaces require early coordination to route power before finishes are installed. Moisture exposure should be considered when specifying components and placement.
Architectural Ceilings and Soffits
Mud-in channel integrates cleanly into dropped ceilings and soffits, creating defined lines of light without visible trim. Layout must be coordinated with framing and other ceiling elements to maintain alignment.
Retail and Hospitality Spaces
Used to highlight architectural features, displays, and circulation paths, mud-in channel delivers a refined, high-end aesthetic. Early planning ensures channels align with signage, millwork, and decorative elements.
Offices and Commercial Interiors
Linear mud-in lighting supports modern, minimalist design while providing functional illumination. Consistency across multiple spaces requires repeatable details and coordinated installation sequencing.
Mud-In Channel vs. Other LED Channel Options
Surface-mounted LED channels are a common alternative to mud-in channel and can be a practical solution when cutting into walls or adding blocking isn’t feasible. Surface-mounted channels still deliver high-quality, diffused linear light but remain visible on the surface of the wall or ceiling.
Mud-in channel stands apart when the design goal is a flush, modern, minimalist appearance. By embedding the channel into the architecture, designers achieve a clean result that feels purpose-built rather than added after the fact.
Design and Specification Considerations
Careful specification is key to a successful mud-in channel installation. LED strip selection should account for lumen output, color temperature, and color rendering. COB strip lights are recommended for mud-in applications, as they are designed for architectural use and provide smooth, dot-free illumination for a clean, finished appearance.
Diffuser lens selection also plays a major role in light uniformity and visual comfort. Managing continuous runs requires planning for power distribution and voltage drop, as LED strips have maximum run length limitations. These electrical considerations are the same as in other LED installations and should be addressed during design.
Common Installation Challenges and How to Avoid Them
Misalignment during framing or drywall installation is one of the most common issues and is best avoided through early planning and proper blocking. Over-mudding or uneven compound application can also compromise the finished look, which is why experienced drywall professionals are essential for these installations.
Cracking along channel edges is another potential concern, but proper blocking significantly reduces the likelihood of movement-related issues over time.
Finally, hot spots can occur if LED spacing or diffuser selection is incorrect. Using high-quality, dotless LED strips, such as our L-series LED strip light, helps ensure smooth, uniform light output.
Conclusion
Mud-in channel is a popular architectural lighting solution because it successfully combines form and function. Its trimless appearance supports modern design intent, while its technical benefits – improved light quality, heat management, and durability – make it well-suited for professional projects. When thoughtfully specified and properly installed, mud-in channel elevates the overall quality of a space and delivers lighting that feels seamless, intentional, and enduring.
For lighting professionals, architects, and designers who regularly specify architectural solutions like mud-in LED channel, our Pro Program offers exclusive pricing, priority support, and specification resources to help streamline your projects. Join today to access tools and expertise designed to support high-end, trimless lighting applications from concept through installation.


