
Once you’ve cut your Neon flex lights to the perfect length, the next critical step is making a safe and secure electrical connection. A proper connection ensures your LED neon lights function reliably, last longer, and deliver a clean, professional look - whether you’re installing accent lighting, signage, or architectural features.
This guide explains exactly how to connect neon flex LED lights, including what tools and accessories you’ll need, how to assemble the components, and tips for protecting your installation from dust and moisture.
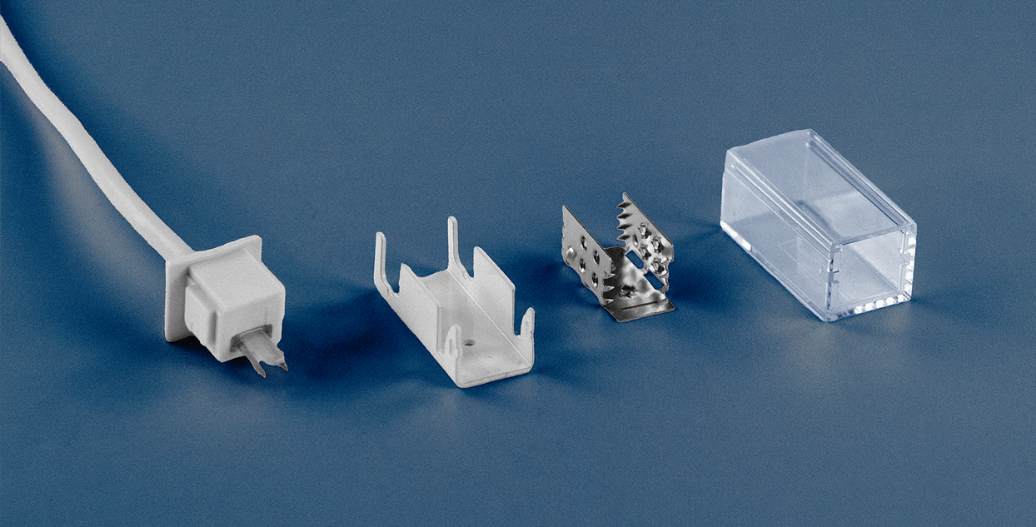
Tools and Components You'll Need
Before you begin, gather the following tools and parts:
- Cut neon flex light
- Input (nose) connector
- Clear plastic sleeve
- Metal teeth bracket
- White "bite" grabber piece
How to Connect Neon Flex Lights: Step-by-Step Instructions
1. Slide on the Plastic Sleeve
Take the clear plastic sleeve and slide it onto the neon light. Make sure the ridged side is facing away from the cut, and the "bottom" side is down, matching the orientation of the light.
2. Prepare the Metal Bracket
Grab the metal bracket with teeth. Use the side with the protruding tab as your alignment edge - this ensures proper positioning when securing it to the light.
3. Attach the Bracket
Gently widen the metal bracket and slide it up from the bottom of the light. Press it into place until the teeth securely bite down into the body of the light. (This helps make a strong electrical contact.)
4. Insert the Nose Connector
Take the cream-colored plastic nose piece and insert it into the cut end of the neon light. Make sure the metal tabs slide underneath the internal wires of the light. Push firmly until it is fully seated and can’t go any further.
5. Lock the Bracket
Position the painted white metal bite grabber (lock piece) and slide it into place over the metal teeth bracket, using the alignment slots to ensure it’s properly positioned.
6. Final Sleeve Positioning
Slide the clear plastic sleeve over the entire connected end. This seals and locks the connection in place, protecting it from dust, moisture, and mechanical stress.
7. Make the Electrical Connection
Locate the two wires in the neon light - red (V+) and black (V-).
- If you’re using a controller, connect the neon flex light to the controller first, then connect the controller to your low voltage power supply.
- Match the red (V+) wire to the power supply’s positive terminal and the black (V−) to the negative terminal using wire nuts or crimp connectors.
8. Test Your Connection
Power on the system and test the neon light to make sure it’s functioning correctly. Double-check all connections if the light doesn't turn on.
And that's it! Your neon flex light is now securely connected and ready to shine. Properly sealing the connection ensures long-lasting performance and a professional finish.
Final Thoughts: Why Proper Neon Flex Connections Matter
Making a secure and reliable connection is essential to the long-term success of your LED neon light installation. Poor connections can result in flickering, short circuits, or premature failure of your lighting system.
To ensure the best performance:
- Use only compatible connectors and mounting hardware
- Double-check your wire polarity before powering on
- Take extra care when sealing outdoor installations
With the right tools and attention to detail, you can achieve a professional-quality finish and ensure your neon flex lights operate safely and efficiently.
Frequently Asked Questions
Why isn’t my connector making a proper connection with the Neon SideFlex?
If your Neon Flex Light isn’t connecting properly, it may be due to the thin plastic film on the underside of the light. This film can prevent the connector pins from making contact with the solder points. To fix this, try reinstalling the connector as close to the strip light as possible. We don’t recommend removing the silicone from the neon, as this makes the connection point much harder to secure. For best results, leave the silicone in place and use our Cutter Tool to ensure a clean, precise cut before reconnecting.


