Kitchen Under Cabinet Lighting with Flexible LED Strip Light
Under-cabinet lighting in a kitchen or work space can add beautiful and functional lighting to your space and the installation really is super easy. Whether you're looking to put them in your kitchen, work area, office, bathroom, entertainment center, bar, theater, or anywhere else, you will be enjoying your finished beautiful under-cabinet lighting in no time.
What are my options for under cabinet lights?
Pre-Built LED Under Cabinet Light Bars
For those looking for a turn-key channel/strip solution pre-sized from the factory, we offer LED light bars in a variety of sizes, allowing you to simply make your wiring connections and attach them. These come with frosted lenses to diffuse light output. Here's what you'll need:
- LED Under Cabinet Light Bars
- Non-dimmable or MLV power supply - Determine wattage by calculating your light bars' total draw. Irrespective of wattage, the maximum run for any of our strip lights or light bars is 32 feet. They may work, but voltage drop will cause them to get gradually dimmer.
- Optional: Controllers - We carry a wide variety of single color controller-dimmers including our basic single color RF dimmer, multi-zone handheld RF dimmer, or multi-zone wall mount RF dimmer controllers. These are not necessary to operate your strip lights, but if you want more flexibility than simply turning them on or off at the power supply, this is what you'll need. Multi-zone controllers are great for controlling under cabinet, in-cabinet, and above cabinet lights separately.
Build your own under cabinet light bars
Our most common under cabinet solution is LED strip lights. These are fast and easy to set up, provide a bright, even light throughout the run, and are small so they require very little cutting and drilling. Here's what you'll need:
- Strip light - we recommend our N-Series Ultra Bright for single color installations, or W-Series RGB Ultra Bright for RGB. All of our strip lights are sold in 16.4 ft reels
- Non-dimmable or MLV power supply - Determine wattage by using the calculator on the N-Series Ultra Bright page. Irrespective of wattage, the maximum run for any of our strip lights is 32 feet. They may work, but voltage drop will cause them to get gradually dimmer.
- Connectors and wires - our strip lights come with wires already attached on both sides, but if you're looking to cut them to length, these will connect safely and securely at the cut points to make installation a breeze. If you're making longer runs, we sell lengths of wire as well.
- Optional: LED strip channel, mounting hardware, and endcaps. These make your LED strips look cleaner and easier to mount, and are available for surface mounting or 90 degree corners. They are not mandatory, but recommended.
- Optional: Controllers - We carry a wide variety of controllers including our single color RF dimmer, RGB or RGBW controller, or WiFi compatible or sound activated controllers. These are not necessary to operate your strip lights, but if you want more flexibility than simply turning them on or off at the power supply, this is what you'll need.
Are these lights waterproof?
Our strip lights are available in non-water resistant, water resistant, and waterproof options depending on your specific application. Our channel should protect from most splashes, but most of our customers choose water resistant strips to be sure. Power supplies, controllers, and other accessories are not submersible, and should therefore be tucked away safely.
How do I dim LED strip lights?
- MLV power supplies are frequently used to dim LED strip lights. This allows you to use a traditional or existing MLV dimmer switch and simplifies installation.
- Non-dimmable power supplies can also be used, despite what the name suggests. Non-dimmable power supplies are lower cost, but require separate controllers to be dimmed. Low voltage dimming is the best option for RGB strip lights, as all our wireless controllers have dimming ability built in. We recommend our RF Dimmer for single color strips, and our RGB touch controller for RGB varieties.
Do these fixtures get hot?
No. Unlike incandescent, fluorescent, and halogen fixtures, the warmest your LEDs will ever get will be about the same as a cell phone in use.
How do LED under cabinet lights compare to traditional incandescent, fluorescent, xenon, or halogen options?
LEDs use up to 80% less energy for the same amount of light, are incredibly durable, and have a number of other advantages:
- Incandescent lights use the most energy and have an inherently high failure rate. They will need to be replaced regularly, in comparison to LEDs which should last 50,000 hours (around 20-30 years) before even beginning to get less bright.
- Fluorescent options have poor color rendering, have to warm up before becoming bright, tend to flicker and buzz, and have unsafe chemicals like mercury inside them.
- Xenon lights generate a lot of heat, and have a limited number of color options, while RGB LEDs can have 16 million different colors to choose from - and are changeable on the fly.
What's the difference between custom making a system with strip light and channel, buying aspectLED under cabinet lights, and standard big-box store units?
aspectLED's low voltage strip lights and light bars are a better option due to their decreased size, lower cost, and increased flexibility. These low voltage solutions have less heavy wiring, typically only need one outlet in an out of the way location, and have low maintenance and no bulbs to replace, plus they generate much less heat.
As for choosing between aspectLED under cabinet light bars or custom LED strip light and channel, it's generally down to preference, budget, and time commitment. Using LED strip light, you don't have to worry about buying multiple sizes of lights, sizing them perfectly and using connectors. You'll also likely save some money going this route. However, many contractors prefer to use pre-made units, cut down install time and save customers money that way. Light output is nearly identical between these two options.
How do I wire in the power supply?
You have a couple options:
- For non-dimmable power supplies, simply plug the power supply into the wall. Our units come with standard US wall connectors, making installation easy. If you'd prefer to hard wire to line voltage to control with a light switch, you can simply cut the plug off the power supply and do so.
- For MLV power supplies for dimming, you can hard wire into a Magnetic Low Voltage dimmer.
How do I determine my layout?
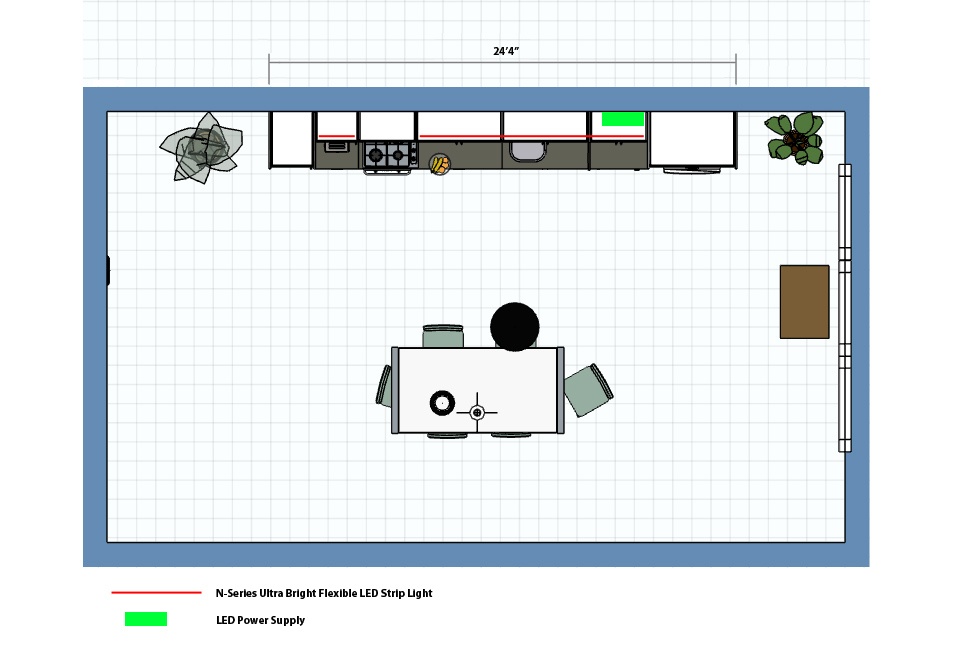
In this example kitchen, we have one wall of wall cabinetry that we are going to install under-cabinet lighting beneath. The red line indicates where we want the Flexible LED Strip Light installed. The best placement for this type of under cabinet task lighting is usually as close to the front of the wall cabinet as possible so as to direct the light near the center of your work surface.
You’ll notice that there is a gap where the microwave is installed as we will not be placing lighting beneath the microwave, but rather jumping over the microwave location.
Should I use 12VC or 24VDC?
aspectLED Flexible LED Strip Lights are all low voltage class 2 devices and they available in two voltage options. This is also true for the aspectLED Power Supplies. It is CRITICAL that you select the same voltage for your strip light and your power supply or they will not be compatible.
As a general rule of thumb, if the length of your strip light run exceeds about 20’, it is best to choose 24VDC for your voltage. 24VDC is a more stable voltage for longer distance runs and will experience less voltage drop. If you have in excess of 32 feet of lights, you will need to run new wires directly back to your power supply from the strip lights that are in excess of the first 32 feet in order to give the next sections adequate power.
How big of a power supply do I need, and where do I put it?
You’ll notice in our kitchen example there is a green box indicating our power supply location. In this example we are locating the power supply inside one of the cabinets where we already have a standard outlet installed that we can plug the power supply into. You may also find it convenient to place your power supply on top of your cabinet if you have the space for an outlet up out of sight and not taking up precious interior cabinet space. The power supply can be located up to 100 feet away from your lighting installation. The most important consideration to make is that you use adequately gauged wire to run the distance from the power supply to your lights.
For optimum performance it is recommended that you do not exceed 80% of the labeled rating of your power supply. You can calculate the correct power supply size by multiplying the watts per foot of your LED strip lights (you can find this on the spec sheet for your particular product) by the number of feet of LED strip. This will give you the actual consumption. Then, multiply this number by 1.2 (to add 20%, so that we don’t exceed 80% loading on the power supply).
As an example, if your LED strip consumed 2.92 watts per foot and you planned to use a full reel (16.4 feet), we would multiple 16.4 times 2.92, which gives us 47.89 watts. To add 20%, we then multiple 47.89 times 1.2, which gives us 57.47 watts. We then round up to the nearest size power supply, which in this case is a 60 Watt LED power supply.
We have a convenient power supply size calculator near the middle of the page on each strip light product page. You can simply enter the total length of strip light that you plan to use and the calculator will do the math for you!
In this example we are using the aspectLED N-Series Ultra Bright LED Strip Light which is the most common strip light used for this application. If you visit the Product Detail page for this product you will notice in the Specifications section you will see the Power Consumption rating is 2.92 Watts per Foot.Example: 2.92 Watts x 14 Feet = 40.88 Watts x 1.2 = 49.06 Watt Power Supply Capacity Needed
The closest power supply that meets our requirements is the aspectLED 60 Watt Power Supply.
Tools you'll need
- Tape measure
- Screw driver
- Wire stripper
- Scissors
- Optional: Drill
- Optional: Miter saw with metal cutting blade (for aluminum channel install
Installation
This guide pertains to building your own under cabinet lights using LED strip light and aluminum channel. If you're using pre-built aspectLED low voltage under cabinet light bars, this guide still may be helpful, but sections (such as cutting to length, installing connectors, and assembling lights into channel) will not pertain and can be skipped.
- Using a jig saw or other small power tool of your choosing, carefully notch the bottom of the cabinet where you intend to place your strip light. This isn't mandatory, but allows for flush mounting of your strip lights.
- Using your tape measure, measure and cut the lengths of Aluminum Mounting Channel you need for your installation.
- It is a good idea to pre drill pilot holes for your small mounting screws in the bottom side of your cabinet. You will want to use small flat tapered head screws. We have found that a flat head #4 screw ½” length works well for installation of the mounting clips. But make sure to check your cabinet thickness to find the correct screw length for your application.
- Install the mounting clips for the aluminum channel into the bottom of the cabinet. A good rule of thumb is to use at least 2 mounting clips per section of channel and if the channel exceeds 4 feet use at least 3 mounting clips.
- Now that your mounting clips are installed, simply snap your aluminum channel into the mounting clips tugging gently to make sure it is secure.
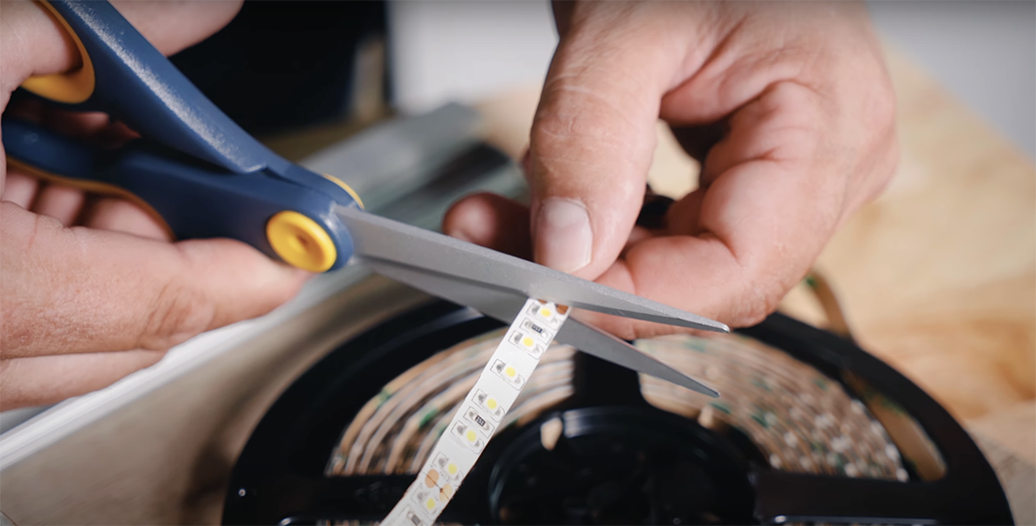
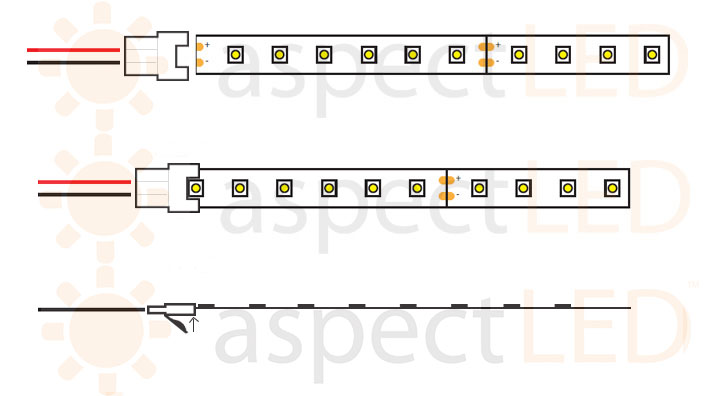
- Measure and cut your strip light to the length you require for your longest run first. Strip lights can only be cut on designated cut lines. You will see the designated cut lines on the strip light like in the below image. Don't worry, the UL listing on your strip lights is still valid, as long as you cut on a designated cut mark.
- Your strip light will come with wire leads on both ends of the 16.4’ reel. For our example, we are going to cut the strip light at approximately 12 feet long for our longest run. Then we will cut a 2 foot long piece off for our small cabinet on the opposite side of the microwave.
- For our example, we want to leave the wire leads on the right side of our run, so as to make connection to the power supply easy and close.
- Attach one of the Strip Light Connectors to the left cut end of the strip light so that we can run our wires over the microwave to connect the small 2 foot section of strip light to the longer 12 foot section to give it power.
- Remove the 3M adhesive tape protective covering from the back side of the strip light and gradually press the strip light up into the aluminum channel so it sticks to the top side and the light faces down. If you are not using aluminum channel you can just stick the strip light directly to the bottom side of your cabinetry.
- Take the smaller 2’ section of strip light and attach the other LED Strip Light Connector to the right end. Follow the same process as you did for the other piece to remove the adhesive tape and stick the strip light up into the channel. Be sure your power supply is not connected to 120VAC power while doing wiring.
- In our example kitchen, we are going to drill a small hole in the bottom front right corner of our cabinet to run our wire up through.
- Send the 2 wires from the LED Strip Light Connector up through the small drilled hole.
- From a spool of wire, cut the needed length to get from your wire leads up to your power supply location.
- We like to hide the wire in the inside corner of the cabinet with small wire staples and run the wire up to the top shelf of the cabinet where our power supply will be located.
- To connect our small 2 foot section of strip light on the other side of the microwave, we will follow the same steps by drilling a small hole in the front right corner of the bottom of the cabinet. Send the wires up through the hole.
- Cut your extension wire to the length you need to go up the cabinet, over through the cabinet above the microwave, and then back down the inside front left corner of the cabinet on the other side.
- Using wire nuts or crimp connectors, connect the corresponding white and black wires on either side of your microwave.
- Now, go back to your power supply location. Connect the (+)black wire on the strip light to the (+)red wire on the power supply. Connect the (-)white wire on the strip light to the (-)black wire on the power supply.
- Check all of your wire connections by gently tugging on them to make sure they are secure.
- Plug in your power supply and VOILA! You should have beautiful light emitting from a great job well done! Once you are comfortable that all of the lights are operating properly, snap the aluminum channel lens in place and you are all done!
Have questions?
We offer free technical support for all of our products. Please feel free to live chat with us or to contact us via phone at (888) 503-1317.
