
Good wire management is one of those things that separates professional installations from DIY disasters. It's not just about making things look clean (though that matters) - it's about safety, code compliance, and making your job easier when you need to service the system later.
Planning Wire Management Before Installation
Good electrical planning for LED lights starts before the first fixture is mounted. Begin by evaluating the type of LED being installed (such as strip lighting, neon lighting, or recessed lighting) and determine where to hide the LED power supply. Next, create a detailed wiring layout or diagram to guide the installation process. Identifying possible concealment routes early ensures a clean, efficient, and code-compliant setup. As always, be sure to check NEC and your local electrical codes to ensure code compliance.
Getting the Wire and Connectors Right
Wire selection matters more than most people think. Use the wrong gauge on low-voltage LEDs and you'll deal with voltage drop and potential overheating. The fix? Always use the proper gauge for your application and stick with UL-listed, code-compliant wire and connectors. For connections, you may choose to use quick-connect terminals for efficiency, or soldered joints for a more permanent and secure connection.
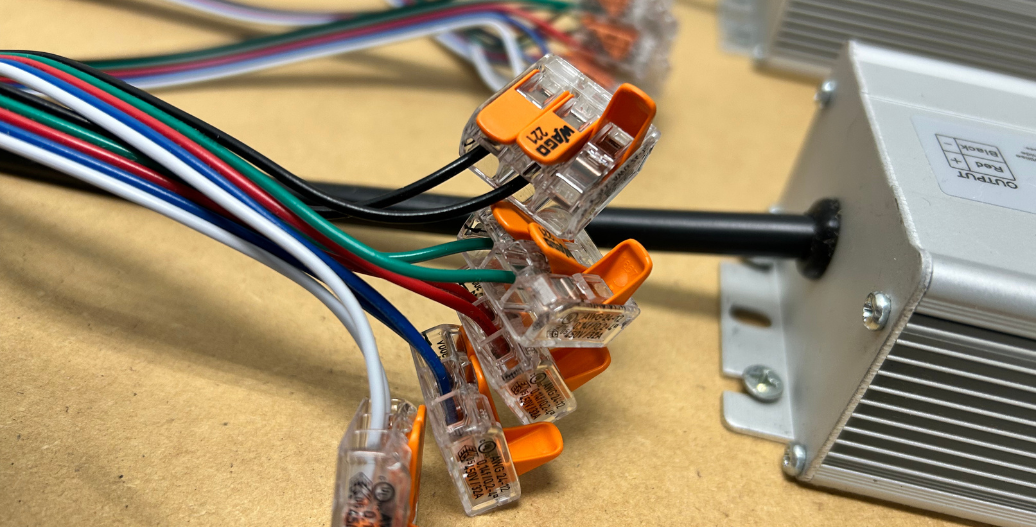
Class 1 vs. Class 2 Wiring:
- Class 1 wiring must always be concealed in an approved enclosure and connected using methods such as wire nuts or lever lock connectors.
- Class 2 wiring may also be enclosed, but in some cases can remain exposed. Depending on your application and local electrical code, acceptable methods include wire nuts, lever locks, or soldering.
Professional Methods for Hiding LED Wires
When it comes to hiding LED strip light wires or concealing cables for fixtures, professionals have several clean and code-compliant options. In-wall wiring (where permitted) is one of the most seamless methods. Just be sure to use wire rated for in-wall use, meaning it has both individual insulation and a protective outer jacket. Always double-check local code requirements before installation. Another great option is wire mold or raceways, which keep low-voltage wires neatly tucked along surfaces and can even be painted to blend in. For line-voltage applications, only use UL- or ETL-listed raceways. You can also route wiring through cabinetry, cove channels, or furniture. Be sure to treat these spaces like you would a wall, using in-wall-rated Class 2 wiring and conduit or raceways for extra protection. Finally, don’t overlook architectural features like crown molding or baseboards. They can be excellent hiding spots for Class 2 wiring, as long as you’re careful with fasteners and maintain proper insulation protection.
Wire Management Accessories and Tools
Professional LED wire management goes beyond just hiding wires – it’s also about organizing them properly. The National Electrical Code (NEC) sets standards, but good organization improves aesthetics and makes installations easier to service. Common accessories include:
- Adhesive cable clips for strip lighting.
- Velcro straps for reusable bundling.
- Plastic zip ties for semi-permanent securing (without over-tightening).
- Metal or PVC raceways for high-visibility areas.
- Magnetic organizers for metal surfaces.
- Label makers or permanent markers for wire identification.
- Wire staples for structured runs.
Maintaining Serviceability Without Sacrificing Aesthetics
An installation is only as good as its ability to be serviced later. Accessible LED wiring makes future troubleshooting easier. Always design your setup with serviceability in mind, whether for yourself or another professional who may work on the system later.
- Provide easy access to power supplies, drivers, and controllers.
- Clearly label wires to eliminate guesswork.
- Use junction boxes strategically to centralize and protect connections.
Common Mistakes to Avoid
Poor wire management can cause more headaches than you might expect - from failed inspections to unnecessary safety risks. A few common mistakes tend to pop up again and again. Running low-voltage wires too close to high-voltage lines without proper separation can create interference and violate code. Over-tightening cable ties might seem tidy, but it can actually damage wire insulation. Cramming wires into tight spaces without considering heat buildup is another code issue that can shorten product life. Skipping labels makes future service a guessing game, and using the wrong gauge or wire type can lead to voltage drop or overheating. Even small details, like leaving unused wires exposed during a retrofit or cutting wires too short (or leaving too much slack), can cause problems down the road. Clean, code-compliant wire management doesn’t just look better, it helps your installation perform safely and reliably for years to come.
Final Tips for Professional-Grade Results
For the best results in professional LED installations:
- Always follow NEC and local electrical code requirements.
- Use manufacturer-recommended accessories and materials.
- Plan and document your wiring layout.
- Remember that clean, well-planned wiring enhances safety, reliability, and performance.
Great wire management ensures LED systems not only function optimally, but also look their best, transforming a standard installation into a truly professional result.
Electrician or Contractor? Our Pro Program offers contractors professional pricing, technical support, and project resources.


