

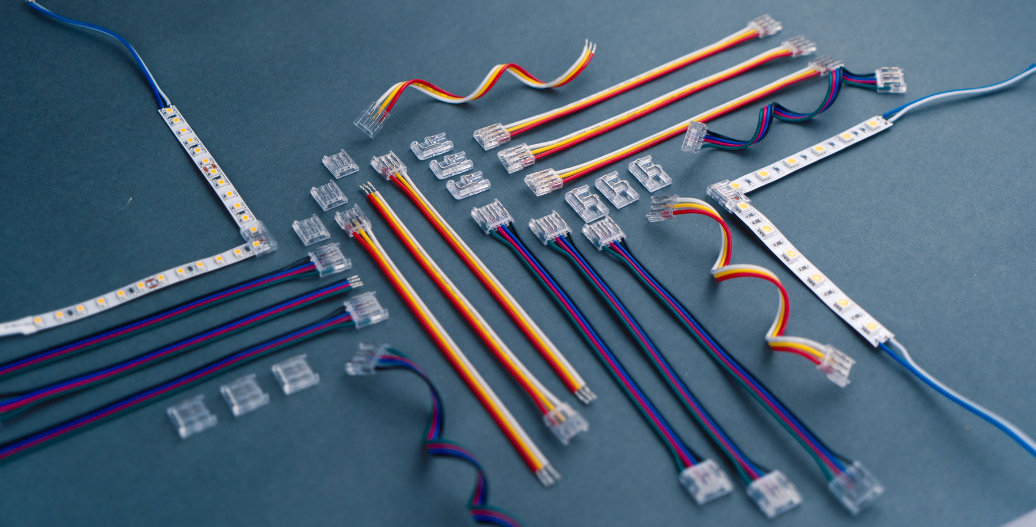

A great LED strip light installation depends on more than choosing the right led strip. Every single connection matters.
Whether you're extending a run, making a 90-degree turn, repairing a cut section, or wiring a strip to a power supply, using the right led light strip connector can save time while creating a clean, reliable installation.
At aspectLED, we've developed a wide range of solderless connectors to make installations faster without sacrificing performance. From our newest bite connectors to our most longstanding connector options, there's a solution for nearly every application.
This guide explains when to use each type of connector and when soldering would be the better choice.
Why Use LED Strip Light Connectors?
Solderless connectors eliminate the need to solder every connection, which takes real time off any install with a lot of terminations. On a job with dozens of connections, that adds up to less time on repetitive work and faster completion, without bringing soldering equipment to the site.
The biggest advantages include:
- Faster installation
- Consistent electrical connections
- Clean, professional appearance
- Easy repairs and modifications
- Less installation time compared to soldering
Soldering still gives the strongest permanent bond, but solderless connectors hold up well across most indoor runs and cut meaningful time off the install. aspectLED's Bite Connectors use precision metal blades that pierce directly into the strip's copper pads, creating a secure mechanical and electrical connection that helps prevent flickering or intermittent contact over time.
When Should You Use a Connector?
Connectors are ideal when you need to:
- Connect a strip light to a power supply
- Extend a strip light run
- Join two cut sections together
- Create a corner without bending the strip
- Jump over gaps or obstacles
- Replace a damaged section of strip
- Speed up installation on projects with many connections
If you're working on a large commercial installation with dozens of connections, solderless connectors can significantly reduce installation time.
Types of LED Strip Light Connectors
Different installation scenarios require different connector styles.
Pigtail Connectors
Use a pigtail connector when you need to add wire to the end of a strip light after cutting it.

Common applications include:
- Connecting to a power supply
- Connecting to a dimmer
- Wiring to a controller
- Starting or ending a strip light run
Splice Connectors
Splice connectors join two pieces of strip light directly together.

These work well when:
- Repairing damaged sections
- Reusing leftover strip
- Extending an installation
- Maintaining a continuous run
Jumper Connectors
Jumper connectors include wire between two strip connections.

They're perfect for:
- Going around corners
- Crossing cabinet gaps
- Jumping over obstacles
- Connecting separated sections of strip
Angle Connectors
For installations that require clean 90-degree turns, angle connectors eliminate the need to bend the strip around tight corners.

Which Connector Do You Need?
The easiest way to choose a connector is by identifying both your strip light type and the connection you need to make.
|
If you need to... |
Use this connector |
| Connect strip light to wire | Pigtail Connector |
| Join two strips together | Splice Connector |
| Bridge a gap | Jumper Connector |
| Make a 90 degree corner | Angle Connector |
| Repair a cut section | Splice Connector |
Bite Connectors vs. Spring Connectors
Our newest Bite Connectors were developed to improve installation speed and long-term reliability.
Instead of relying on spring pressure, Bite Connectors use precision blades that pierce the strip's copper pads, creating a secure permanent electrical and mechanical connection. The result is a compact connector that's easy to install and resistant to vibration and movement over time.
Benefits include:
- No soldering required
- Secure long-term connection
- Compact profile
- Reduced chance of loose contacts
- Faster installation
- Available for many current aspectLED strip lights
How to Install a Bite Connector
Installing a Bite Connector only takes a few minutes.
- Turn off power to the installation.
- Cut the strip light at the designated cut mark.
- Insert the cut strip light into the connector, making sure the copper pads on the strip are fully aligned with the precision blades on the connector.
- Verify the polarity matches the connector markings.
- Use parallel jaw pliers (preferred) or needle nose pliers to fully engage the teeth of the connector until it is securely fastened.
- Restore power and test the connection.
A properly installed Bite Connector creates a secure mechanical connection without soldering, helping speed up installation while maintaining reliable performance.

When Is Soldering Still the Better Option?
Although connectors are an excellent solution for many projects, soldering is still the preferred method in certain situations.
Consider soldering when:
- Working in extreme environments
- Making custom wiring configurations
- Building permanent specialty fixtures
- Working with strip lights that don't have compatible connectors
- When the space confines are too small for a bite connector, which is the case for certain aluminum channel
Find the Right Connector for Your Project
Choosing the correct connector can make your installation cleaner, faster, and easier to maintain.
Whether the job is under cabinet lighting, accent lighting, architectural lighting, or a commercial strip run, aspectLED connectors are built to match our strip lights so the connection holds up as well as the fixture it feeds.


