

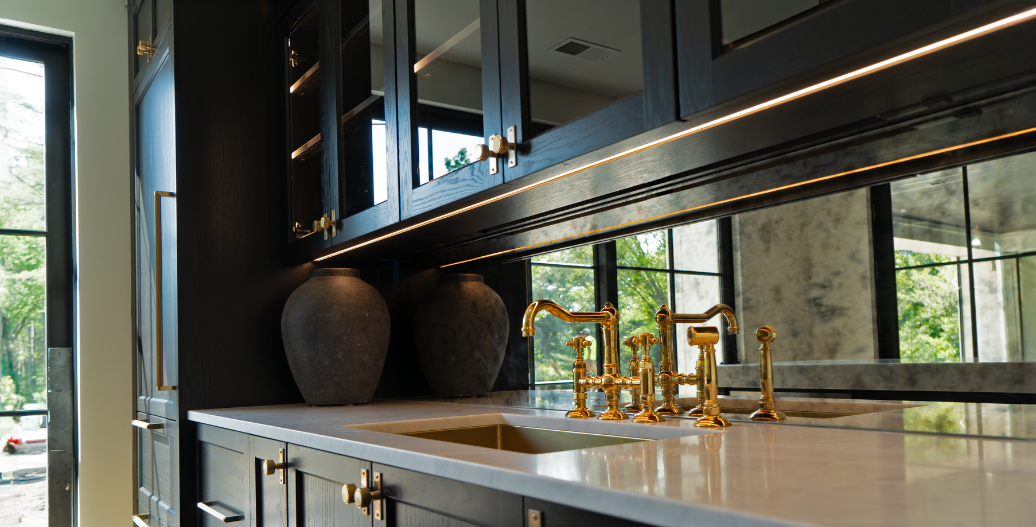

Under cabinet lighting is one of the most requested upgrades in modern kitchens. LED strip lights under cabinets improve task visibility, enhance the appearance of countertops and backsplashes, and create a more polished, high-end feel.
But once the decision to add under cabinet lighting is made, electricians and designers tend to run into the same question:
How do you get from one cabinet section to the next?
Most kitchens are not made up of one continuous cabinet run. There are often windows, sinks, ranges, refrigerators, open shelving, or gaps that require the lighting system to "jump" from one cabinet section to another.
The method you choose for making those jumps affects installation complexity, appearance, serviceability, cost, and long-term performance.
The good news is that there are several ways to accomplish it. The best solution depends largely on where the project is in the construction process.
This guide walks through the most common approaches, from ideal new construction scenarios to retrofit installations where the cabinets are already in place.
Start With the Most Important Question
Before selecting a lighting system, determine: Are the walls open, or is the kitchen already finished?
This single question drives almost every wiring decision. If you're building a new home, remodeling down to the studs, or replacing cabinetry, you have significantly more options. If the cabinets, backsplash, drywall, and countertops are already installed, you'll need solutions designed around the existing conditions.
Should You Wire Under Cabinet Lighting at the Same Time?
Yes. If you're already roughing in wiring for the kitchen, that's the ideal time to plan for hardwired under cabinet lighting. Planning ahead also makes installing LED strip lights under cabinets significantly easier once the cabinetry is installed. Appliance circuits for microwaves, dishwashers, and many range hoods are typically dedicated circuits and generally aren't intended to power lighting. Instead, rough in a dedicated lighting feed to the LED driver location.
If the cabinet layout is finalized, electricians can also rough in low-voltage pathways to each cabinet section before drywall. Coordinating with the cabinet installer ensures wire exits are hidden beneath the cabinets.
Where Should You Put the LED Driver or Transformer?
For the cleanest installation, easiest future maintenance, and to follow code requirements, the power supply must be installed in a centralized, accessible location. Common options include a pantry, utility room, basement below the kitchen, above the upper cabinets, or inside an accessible cabinet. Choosing a location that remains easy to access allows for simpler servicing or replacement while helping minimize low-voltage wire runs and maintain a clean, professional installation.
Let's start with the ideal scenario.
Option 1: Open Walls and New Construction (Best Practice)
If the walls are open and cabinetry has not yet been installed, this is the easiest and cleanest time to plan under cabinet lighting.
At this stage, wiring can be concealed completely within the wall structure before drywall is installed.
Recommended Approach: Hardwired Low Voltage System
For most projects using LED strip lights under cabinets, a hardwired low voltage system provides the best combination of performance, flexibility, and future serviceability.
A typical system includes:
- 120V power brought to a central location
- A dimmable low voltage power supply
- In-wall rated low voltage wiring
- LED strip lighting installed beneath cabinets
With open walls, low voltage wire can be run directly to each cabinet section before drywall is installed.
This allows every cabinet run to receive power without visible wiring.
Advantages
- Completely hidden wiring
- Cleanest finished appearance
- Easy cabinet-to-cabinet transitions
- Flexible dimming and control options
- Simplified LED strip installation
- Easier future upgrades
Typical Example

A kitchen has:
- Sink wall with cabinets
- Window above sink
- Separate cabinet run to the left
- Separate cabinet run to the right
Low voltage wire can be routed through wall cavities to both cabinet sections before drywall is installed. Once cabinets are mounted, the wiring emerges through small holes hidden underneath the cabinets.
The result is a seamless lighting installation with no visible jump wires.
Option 2: Open Walls With Line Voltage Routed to Multiple Locations
Another common approach during construction is running line voltage to multiple locations behind the cabinets.
Instead of routing low voltage wiring throughout the kitchen, electricians install 120V wiring where power is needed and place power supplies closer to individual cabinet sections.
Advantages
- Familiar installation method for electricians
- Shorter low voltage wire runs
- Reduced voltage drop concerns
- Flexibility for larger kitchens
Considerations
This approach typically requires more power supplies.
Instead of one centralized power supply serving the entire kitchen, multiple power supplies may be needed.
That can increase:
- Equipment costs
- Installation time
- Future maintenance requirements
For many kitchens, centralized low voltage distribution remains the preferred solution because it reduces the number of components that must be serviced later.
Hardwired vs. Plug-In Under Cabinet Lighting
For most professional installations, electricians recommend hardwired under cabinet lighting because it delivers a cleaner appearance, integrates seamlessly with wall dimmers and lighting controls, and offers better long-term serviceability. Plug-in systems can be a practical option for retrofit projects or situations where running new wiring isn't feasible, but they often require visible cords or nearby receptacles. For permanent installations, hardwired systems provide the most polished, reliable, and professional result.
Option 3: Cabinet Installation Is Happening Soon, But Walls Are Still Accessible
Many remodels reach a stage where drywall remains open but cabinets are scheduled for installation shortly.
This is the ideal time to coordinate lighting plans between:
- Electricians
- Cabinet installers
- Designers
Small planning decisions made now can eliminate major installation challenges later.
Best Practices
Before cabinets are installed:
- Identify all cabinet sections requiring lighting
- Determine where power supplies will be located
- Route wiring to each cabinet run
- Plan for future service access
- Confirm dimming and control requirements
Many under cabinet lighting challenges occur because lighting is considered after cabinets are already mounted.
A few hours of planning during rough-in can save days of installation work later.
Option 4: Existing Cabinets With No Access Behind Walls
Most under cabinet lighting jobs are retrofits, not new construction. The cabinets are set, the backsplash is finished, and opening the drywall is off the table. Adding lighting is still very doable, but it calls for a different approach, which is where the next options come in.
Option 5: Fish Low Voltage Wire Through Existing Walls
When conditions allow, low voltage wire can often be fished through existing wall cavities. Fortunately, LED strip lights under cabinets can still be installed with minimal disruption using several proven retrofit wiring methods.
This approach involves:
- Accessing wire entry points beneath cabinets
- Fishing wire through wall cavities
- Bringing wire back out beneath another cabinet section
Advantages
- Hidden wiring
- Professional appearance
- No visible jump wires
Challenges
Success depends heavily on what's inside the wall.
Potential obstacles include:
- Fire blocking
- Insulation
- Plumbing
- Electrical wiring
- Structural framing
Some installations are straightforward. Others become nearly impossible without opening drywall. Whenever wall fishing is feasible, it is usually the preferred retrofit solution.
Option 6: Route Low Voltage Wire Behind the Backsplash
In some remodel situations, the backsplash has not yet been installed. This creates a valuable opportunity. Low voltage wire can often be routed horizontally behind the future backsplash area. Once the backsplash is installed, the wiring becomes completely hidden.
Advantages
- Hidden appearance
- Less invasive than opening walls
- Excellent retrofit solution
For kitchens nearing completion, this can be one of the most effective ways to connect separate cabinet runs.
Option 7: Surface-Mounted Low Voltage Jump Wires
Sometimes concealed wiring simply isn't practical. In these situations, surface-mounted low voltage wiring can provide an accommodating solution.
The goal becomes making the wire as discreet as possible.
Common methods include:
- Concealing wire beneath cabinet lips
- Using paintable wire channels
- Running wire along cabinet edges
- Routing wire through trim details
- Tucking wire into corners
Advantages
- Minimal construction required
- Cost-effective
- Quick installation
- Easy future access
Challenges
- Wiring may still be visible in some locations
- Appearance depends heavily on installation quality
- Fewer routing options than concealed wiring
- Less seamless than in-wall wiring
Considerations
The success of this approach depends on craftsmanship. A carefully planned wire path may be virtually invisible from normal viewing angles. A poorly planned installation can draw unnecessary attention. Installers often use cabinet shadows, trim profiles, and architectural details to hide wiring successfully.
Option 8: Wire Mold and Decorative Surface Raceways
For situations where wiring must remain exposed, decorative raceways can provide a cleaner appearance.
These products create a protected pathway for wiring while maintaining a finished look.
Advantages
- Protects wiring
- Paintable options available
- Simple installation
Challenges
- Visible raceway is an aesthetic compromise
- Less seamless than concealed wiring
- Can interrupt clean cabinet lines
- Requires careful placement for the best appearance
Best Applications
- Existing kitchens
- Historic homes
- Projects where wall access is limited
- Budget-conscious upgrades
While not as invisible as concealed wiring, raceways can produce clean results when installed thoughtfully.
Option 9: Separate Lighting Zones
Sometimes the best solution is not connecting cabinet sections at all.
Instead, each cabinet run becomes its own lighting zone.
For example:
- Left cabinet run
- Sink cabinet run
- Right cabinet run
Each section receives power independently.

Advantages
- Simplifies wiring
- Reduces difficult jumps
- Easier retrofit installation
Considerations
Multiple zones may require:
- Additional wiring
- Additional controllers
- Additional power supplies
However, our lighting controls can make managing multiple zones simple.
For difficult retrofit projects, separate zones can be an excellent compromise.
Low Voltage vs. Line Voltage Under Cabinet Lighting
One of the most common questions is whether cabinet-to-cabinet jumps should use line voltage or low voltage wiring.
In most under cabinet lighting systems, low voltage wiring is the preferred choice.
Why Low Voltage Usually Wins
Low voltage wiring offers:
- Greater installation flexibility
- Smaller wire size
- Easier routing
- Compatibility with LED strip lighting systems
- Simplified cabinet transitions
- CCT, RGBW, and RGBCCT can be run with low voltage wiring if desired.
The power supply converts incoming 120V power to low voltage, and the low voltage side is distributed throughout the lighting system.
This approach is common across residential LED lighting installations because it allows lighting to be placed exactly where needed without routing line voltage everywhere.
When Line Voltage Makes Sense
Line voltage distribution may be advantageous when:
- Kitchens are very large
- Power supplies are distributed throughout the space
- Electrical infrastructure already exists in multiple locations
- Project specifications require it
For most residential under cabinet lighting projects, however, low voltage distribution remains the preferred approach.
Can Under Cabinet Lighting Share a Circuit With a Microwave, Dishwasher, or Range Hood?
During kitchen rough-in, electricians are often asked whether under cabinet lighting can share an appliance circuit. Because microwaves, dishwashers, and many range hoods typically use dedicated circuits, under cabinet lighting is generally planned on its own lighting circuit with a separate LED driver or power supply.
The Recommended Strategy for Most Projects
If you're starting from scratch and have open walls:
Best-in-Class Recommendation
- Plan lighting before cabinets are installed.
- Choose a high-quality low voltage LED system.
- Centralize power supply locations where practical.
- Run in-wall low voltage wiring inside walls to every cabinet section.
- Provide access for future service and maintenance.
- Coordinate lighting, cabinetry, and electrical work early in the project.
This approach delivers the cleanest appearance, the fewest compromises, and the best long-term results.
If you're working with existing cabinetry:
Next Best Recommendation
- Fish low voltage wiring through walls whenever possible.
- Use backsplash cavities when available.
- Conceal surface wiring within cabinet details.
- Use decorative raceways only when hidden wiring isn't practical.
- Create separate zones if cabinet-to-cabinet jumps become overly complicated.
Conclusion
Under cabinet lighting is one of the higher-impact upgrades in a kitchen, but the quality of the installation often comes down to one overlooked detail: how you get from one cabinet section to another.
The ideal solution is almost always determined by the stage of the project.
Whether you're installing LED strip lights under cabinets in new construction or retrofitting an existing kitchen, choosing the right wiring strategy results in a cleaner installation and better long-term performance.
The key is evaluating your project early, understanding your available pathways, and selecting a wiring strategy that balances appearance, performance, serviceability, and installation effort.
The earlier lighting is considered in the design process, the more options become available, and the better the final result will be.
Whether you're installing hardwired under cabinet lighting during new construction or retrofitting LED strip lights under cabinets in an existing kitchen, planning wire pathways early helps produce cleaner installations, simplifies future maintenance, and minimizes installation time.
Ready to Plan Your Under Cabinet Lighting Project?
Whether you're building a new kitchen, remodeling an existing space, or upgrading cabinets that are already installed, the right wiring strategy is the difference between a system that looks added on and one that reads as built in - clean transitions, reliable performance, and a finished result that holds up for years.
Explore aspectLED's professional-grade LED strip lights, power supplies, aluminum channel, and installation accessories for your next under cabinet lighting project, or contact our team for project-specific guidance on the best way to wire your under cabinet lighting system. We can help you design a solution that delivers clean transitions, reliable performance, and a finished appearance you'll be proud to show off for years to come.


